Choosing the best sweater construction method is almost as important as choosing a sweater shape that flatters your figure. Because humans have been creating knitted garments for quite a while there are plenty of different options out there for how to make a sweater. However, the most popular methods for constructing sweaters are set-in sleeves, raglan sleeves, dolman sleeves and circular yoke sweaters. A couple less popular methods include saddle shoulder and contiguous set-in sleeve constructions. Each method has its own pros and cons but no matter which style you choose you can make a great looking sweater!
Set-In Sleeve Method
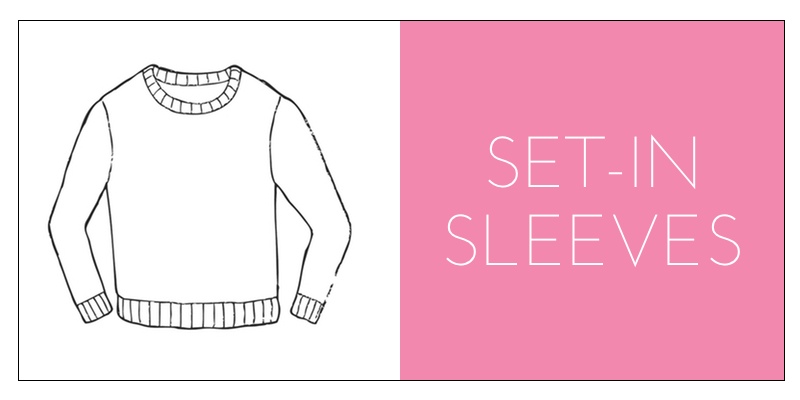
The definition of set-in sleeves is “a sleeve joined to the body of a garment at the shoulder and having a seam at that juncture”. That just means that this type of sweater is knit in flat pieces (much like the pieces you cut out of fabric when sewing a garment) then seamed together using an appropriate seaming technique.
A fitted waist, fitted shoulders, and set-in sleeves give the garment the sharp, flattering silhouette that we all love to wear. This tailored shape is generally easier to achieve if sleeves are knit separately and sewn in place because you can shape the individual pieces of the sweater to fit your shape before attaching them. The presence of seams also helps to hold the garment in place as you’re wearing it.
The seams on a sweater supply stability to your garment in addition to holding it together. A sweater that is seamed together is more stable. That means that as the sweater gets worn and washed it will hold its shape better. Yarns have a tendency to break in (like jeans and or shoes) and a little of that is fine. However, some yarns tend to keep breaking in over time and need the added stability that seams provide. Knitted fabric is inherently fluid and your choice of fiber can amplify this quality. Fibers that lack natural elasticity like cotton, linen, silk, and bamboo can cause a finished sweater to stretch, sag and droop. The more drape your fabric has (be it because of fiber type or gauge) the more likely it is to stretch out of shape. If your sweater has seams and strong cast-on and bound-off edges and you’ll be better able to keep this sagging and stretching in check. Side seams and sleeve seams provide structure that will help keep your sweater from growing longer with wear. Shoulder seams and a bound-off back neck will help prevent droopy shoulders..
Used as a decorative element, seams can be fashionable as well as functional. Exposed seams on a cotton sweater are a great casual look. Just sew the seams inside-out, so the selvedges roll to the outside. Accent them even more by overcasting the seam with a contrasting color yarn. Highlighting the shoulder and armhole seams of a sweater with an applied I-cord, or a crochet chain can mimic piping, adding a fancy dressmaker detail. Think of seaming as another creative element to your work and it will seem like an opportunity for personal expression, not a boring chore.
If you are the sort of person who carries knitting with you wherever you go, you may find it easier to work a sweater in pieces because you only ever need to carry a small amount of the project with you at any given time and it will fit easily in your handbag. Because a sleeve is really not much bigger than a sock it is a lot less conspicuous than a big pile of sweater in your lap.
Raglan Sleeve Method
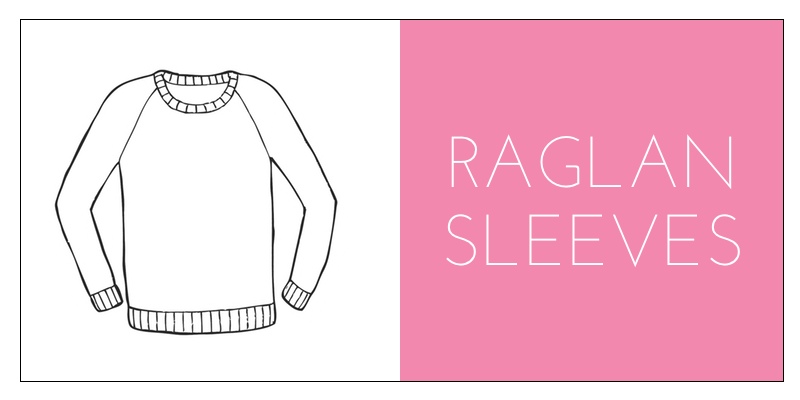
The defining characteristics of Raglan sweaters is that they have no shoulder seam. Beginning at the neckline the sleeve cap expands to become the shoulder of the garment. This shaping detail creates a clear line which looks like a long diagonal seam running from the neck to the underarm. Raglan shaping is usually worked seamlessly from the top down but it can also be worked in pieces and seamed together.
This style is was named for Fitzroy Somerset, Lord Raglan, the commander-in-chief of forces during the Crimean War. Raglan lost his right arm in the Battle of Waterloo and some have speculated that the raglan style was developed by his tailor to fit better on his armless side than a traditional shoulder and sleeve.
Because raglan shaping produces such a clear diagonal line on the front and back of the garment, the increases used to add width to the fabric are often decorative as well. Yarn overs, cables or another decorative feature may be worked along the raglan line to bring more emphasis to the shaping.
If you opt for the top down construction of this style of sweater it can easily be “tried on” by slipping it off the needle and onto some waste yarn or multiple circular needles. This feature makes it easier to judge the fit and modify accordingly. For example, sleeve length can be easily extended or shortened simply by ceasing knitting at the desired point. You will also have a clearer sense right away if you are going to run out of yarn or not, as you will be able to see the full progress of the entire garment as you knit it. When you get down to the torso of the sweater it can easily be shaped and fitted any way you like it.
One wonderful thing about raglan sweaters is that due to the method of increasing it is fairly simple to integrate patterns into the yoke and body of the sweater. Additionally the increases allow for great creativity to highlight the style lines of the raglan “seam”.
Dolman Sleeve Method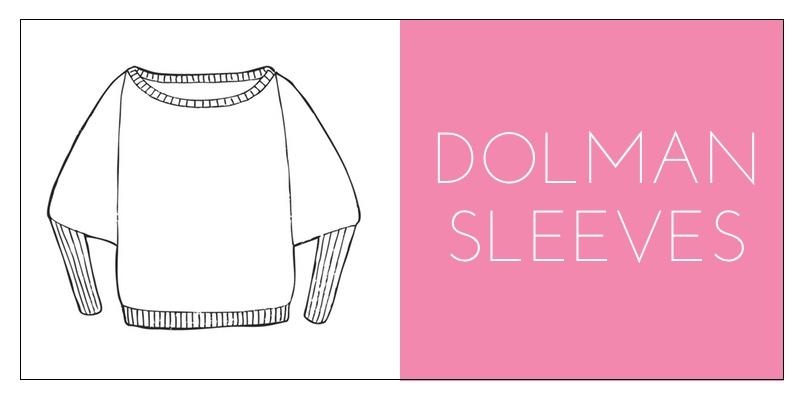
The term ‘dolman’ is a Turkish word meaning ‘robe.’ It is named for a loose-fitting garment that was similar to the cassocks commonly worn by Catholic priests. It was worn in the Middle East and Turkey during the Middle Ages. This style was then copied by Europeans in the 16th century, and used as a military jacket. This style of sleeve has seen several periods of popularity in recent history. In the early part of the 20th century, it was lauded as an exotic fashion from the East. During the 1940s, post-depression culture spawned a desire for decadence and elegance, and the dolman sleeve was considered one of the most fashionable choices a woman could make. In the 1980’s, the dolman sleeve had a resurgence in fashion culture, and was known as the batwing sleeve. This was due to the shape made when the arms were held out to the sides of the body.
A dolman sleeve is narrow at the wrist and wide at the point where the arm attaches to the garment. If you were sewing, the sleeve would be cut as a part of the torso of the garment, eliminating the need for stitching under the arms. Sleeves in this style can be anywhere from slightly over-sized or reach all the way down to the waist. Dolman sleeves were originally popular because they were simpler to sew than set-in sleeves. When you’re knitting a dolman style sweater it saves time because you generally don’t have to seam the sleeves to the body and if seams are required they are very simple to execute.
Originally, a true dolman sleeve was required to come to the wrist, but many current styles include three-quarter length or short sleeves as well. Dolman-sleeved garments are typically made of light, flowing material rather than heavy cotton or wool.
There are a few ways to make a dolman style sweater, cuff to cuff, front hem over top to back hem or in two pieces. Because of the shape of the pieces, dolman-sleeved garments are usually knit flat. If a dolman-sleeved garment is worked from bottom to top in two pieces the front and back are seamed along the underarms and over the tops of the sleeve and shoulder. If the garment is knit in one piece from front to back, the front is worked but is not bound off at the upper edge. Instead, the body on either side of the neck is worked, with neck shaping until the neckline on the back. Extra stitches are cast on in the middle of the next row to join the body back and then the body is knit to the back (To assemble, the garment is folded together at the shoulder, and the underarm seams are sewn. Either way, there are at most 2 pieces to seam together and you don’t have to worry too much about the pieces fitting together. The seams are simple and mostly straight.
Dolmans also provide for continuity of pattern from sleeve to body. This fact is particularly handy if you’re knitting a color work, lace or cable pattern. This is true unless the garment is knit sideways or front to back, in which case there will be an interruption at the neckline or over the shoulder.
The dolman sweater is easy to fit because usually this style of sweater is worn large or slightly baggy. Since there is no seam between the sleeve and body, the dolman style “forgives” an imprecise fit at the upper body. Additionally, there is traditionally no shaping for the body so one size could fit many figures.
Circular Yoke Method

The circular yoke style sweater is one of the easiest sweaters to knit from the top down but it can also be knitted from the bottom up. This style of sweater is unique in its lack of visible armhole shaping.
This type of sweater has been around for quite a long time and is thought to have originated with Bohus Stickning. However the style spread and became very popular in the Shetland island region and Iceland. The Icelandic name for the circular yoke sweater is “lopapeysa” and is typically knit in the very warm “Lopi” wool.
For the top down version, stitches are cast on at the neckline then increased at four even intervals to the widest circumference at the the armhole depth. As you’re knitting the yoke there is no difference between the front, sides and back of the sweater. When the yoke measures the desired depth, stitches for the sleeves are placed on a holder and the front and back are joined and worked in one round to the bottom edge of the sweater. The stitches on the holders are then picked up and worked in the round all the way down to the cuffs.
For the bottom up version, stitches are cast on at the hem of the sweater then knit in a tube up to the armholes. Sleeves are cast on at the cuff and worked up the the armhole. At this point the sleeves are joined to the body of the sweater and stitches are decreased in four even intervals up to the neckline.
Circular yoke sweaters have surged in popularity in the last couple decades with the rise of seamless sweaters. Their charming style and wide range of design possibilities makes them a dream to knit and experiment with.
If you opt for the top down construction of this style of sweater it can easily be “tried on” by slipping it off the needle and onto some waste yarn or multiple circular needles. This feature makes it easier to judge the fit and modify accordingly. For example, sleeve length can be easily extended or shortened simply by ceasing knitting at the desired point.
One wonderful thing about circular yoke sweaters the increases are distributed evenly around the neckline which works wonderfully with decorative increases. If the increases are decorative you can create a lacey look almost effortlessly. In the same vein, you can do invisible increases instead incorporate a beautiful, uninterrupted color work or texture patterns on the yoke.
Whether knit top down or bottom up the circular yoke sweater has no seams so when you’re done knitting your sweater is finished. For those of you that dislike the idea of seaming this factor alone may make you choose to try knitting a circular yoke sweater.
One of the disadvantages of sweaters constructed seamlessly is the lack of structure provided by seams. This can mean that you will be limited to yarn choices that include some structure and elasticity themselves, such as wool or wool blends, and plied yarn. With certain yarns, the sweater may twist on you over time, having been knitted in a spiral, which is what “in the round” technically ends up being. Overall the lack of structure can make for a less durable sweater. Because the shoulders and armholes are not well defined on a circular yoke sweater, the yokes will have a less tailored fit than raglan or set-in sleeve silhouettes. But you can still get a trim fit with the addition of waist shaping.
Moving On
In the next module you’ll learn about choosing yarn and how the different types of fiber affect your finished sweater. Onward!