Today we’ll get started with the finishing work on your sweater. Specifically, we’ll be focusing on blocking and seaming. Tomorrow you’ll be finishing up your seams and adding your neckline treatments.
For today’s tasks you will need your Sweater Measurement Worksheet.
BLOCKING
Before you begin blocking you’ll need to weave in all of your loose ends. For a great video on how to weave in ends click HERE.
There are a few different ways of blocking your knitted pieces, misting, steam blocking and wet blocking. All of the methods serve the same purpose, to set your stitches in place, even out your knitting and give your project a professional looking finish. Each method is good for a different type of knitted fabric, just choose the one you think would suit your fabric best.
MISTING
Misting is a good choice for delicate fibers (like silk), synthetic fibers (acrylic) and cellulose fibers (bamboo, seacell, etc) and for when your item doesn’t need severe stretching. This method tends to dry much more quickly than wet blocking but still a bit slower than steam blocking.
1. Pin the finished pieces out on your blocking surface (I like to use T-pins because they don’t rust). Use your sweater measurement worksheet to determine the measurements to pin your pieces.
2. Using a spray bottle of cool water, mist the entire surface until it feels moist. It is important that the fabric absorbs enough water so that the underside of the fabric is damp.
3. Leave the pieces pinned in place until completely dry.
4. Remove the pins gently, being careful not to stretch the knitting.
STEAMING
Steaming is a great option when your item doesn’t need severe stretching or when you just need to block a few specific areas (like rolling edges). You can expect it to dry much more quickly than wet blocking. Steam blocking should not be used for silk, synthetics and cellulose fibers because the heat may damage them.
1. Pin the finished pieces out on your blocking surface (I like to use T-pins because they don’t rust). Use your sweater measurement worksheet to determine the measurements to pin your pieces . Be sure that the surface you are using to block on can withstand heat.
2. Using a clothing steamer or steam iron, hover it over the surface of your knitting without touching it to the fabric. Start with the lowest setting that produces steam to see if the fabric responds by relaxing to it’s pinned out dimensions. If not, you can turn the heat up to the setting for the fiber content of the yarn.
3. Leave the pieces pinned in place until they are completely dry.
4. Remove the pins, being careful not to stretch the knitting
WET BLOCKING
This method works best when you want to make the biggest difference in appearance and behavior of your knitted fabric. It will work for all fiber types as long as you treat them gently.
1. Fill a sink or tub with lukewarm water. Add a small amount of wool wash if you’d like.
2. Place your knitted pieces into the water and let soak for 20 – 30 minutes. Do not agitate the water too much as we don’t want to accidentally cause the fabric to felt.
3. Drain the water out and squeeze as much water out of your knitting as possible by pressing it against the sides of the sink. Do not wring out your fabric.
4. Support your piece from below (to avoid stretching and place them on a dry, fluffy towel. Roll the towel up with the knitted pieces inside and step on the towel roll to get as much moisture out as possible.
5. Lay your pieces flat on your blocking surface and use your sweater measurement worksheet to pin each piece to the desired dimensions. I like to use stainless steel T-pins as they don’t rust.
6. Leave everything pinned until it is completely dry. You can speed up the dry time by turning on a fan nearby.
7. Remove the pins gently, being careful not to stretch the knitting.
SEAMING
Now that your pieces are beautifully blocked, it is time to sew everything together. Depending on the area of your sweater that you are seaming you will want to use different techniques.
Sew your seams with a darning needle in the following order: shoulder seams, set in the sleeve cap in the arm hole, side seams then the sleeve from underarm to wrist.
SHOULDER SEAMS
For this seam I like to use a technique called weaving. Weaving is a way of joining knitting where you sew what looks like a new row of stitches. It is similar to the Kitchener stitch but instead of weaving live stitches together we will be using the bound off stitches of the shoulders. This technique offers a very sturdy seam that will wear and hold its shape well. For a video of this technique click HERE.
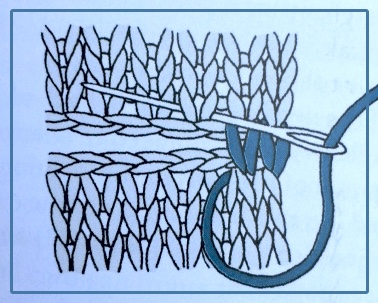
1. Lay both pieces right side up and line up the edges to be seamed.
2. Find the place in the first row where a stitch comes together and forms a V pointing toward the edge of the fabric and insert your darning needle under those two strands.
3. On the opposite side of the seam, find the first stitch that comes to a V pointing at the edge of the fabric and insert the needle under those two strands.
4. Go back to the first side, insert the needle under the V of the next stitch. Note: Go back into the same spot your last stitch came out of in step 2.
Alternate from side to side in this manner until your seam is complete. Weave in ends.
SETTING IN THE SLEEVE
To set in the sleeve you will need to use a few seaming techniques because of how the curve of the sleeve cap meets the armhole. For this seam you will be using weaving, a combination seam and the mattress stitch. Watch the video for weaving HERE for the combination seam HERE and the mattress stitch HERE.
1. Begin by using safety pins to pin the sleeve cap into the armhole.
2. Use weaving to seam along the straight section of the underarm.
3. Along the diagonal side of the sleeve cap, which is matched to the diagonal and vertical side of the armhole, use mattress stitch, sewing between the two edge stitches on both sides of the seam.
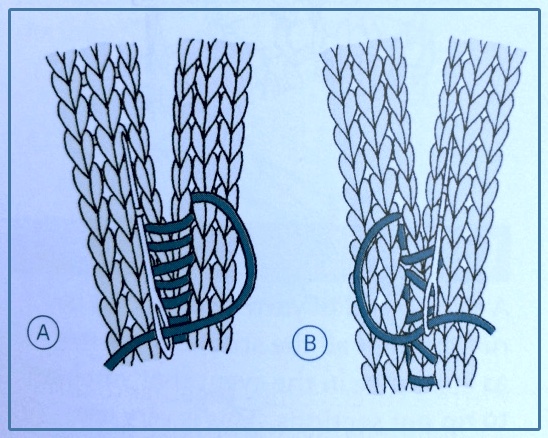
A: Shows working into every stitch. B: Shows working two at a time.
4. Use combination seaming where the top of the sleeve meets the side of the armhole. Remember that in Stockinette, stitches are wider than they are tall, so you’ll need to adjust for this by occasionally working under two strands on the armhole side of the seam.
A: Shows technique. B: Shows why occasional adjustment is needed.
SIDE & SLEEVE SEAMS
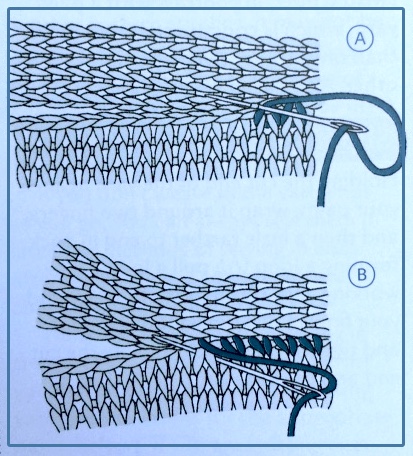
Both the side seams and the sleeve seams are done in the same manner using the mattress stitch. For the mattress stitch the video is HERE.
A: Shows working into every stitch. B: Shows working two at a time.
1. With the right side of the fabric facing you, work a full stitch in from the edge. Sew under one strand on each side with every stitch working alternately from one side to the other.
2. As you sew, pull the yarn tight so the yarn you are using disappears into the seam and the two edges draw together. Keep it loose enough that the seam still stretches a little bit.
NOTE: For a less bulky seam and one that takes half the time to work, sew under two strands on each side with every stitch.
CONGRATULATIONS!!! Once you finish your blocking and seaming all you have left to do is to add your neckline treatment (and button band for cardigans).