For this sweater you will be knitting from the top down, starting with the neck and increasing to make the back, front, and sleeves seamlessly. It may seem tricky at first but once you begin to understand what is going on it becomes truly magical! The cast on and increases are the hardest part of knitting this type of sweater so once you get past this section you’re home free!
Today you will cast on and begin your increases to create the rest of the neckline. However, before you can cast on you will need to determine how many stitches to cast on and in which order. To make things easy, download and print this worksheet first.
Click here to download the Cast On Worksheet
How It Works
During the cast on you will be using a fairly small number of stitches. As you begin knitting you’ll use strategically placed increases to add the rest of the stitches. The reason we begin this way is to create something called a dropped neckline so that the finished sweater lays comfortably in the front and your head fits easily through the neck opening.
As you cast on you will be placing stitch markers to divide the total neck stitches into portions for the front back and sleeves. The four markers of the same color (we’ll call this color A) will be used to separate the front, sleeves and back. The other two stitch markers (color B) will be used to mark the right front and left front stitches.
Cast On Order
Fill in the blanks on your cast on worksheet to determine how many stitches to cast on and in which order to cast them on. You will cast on in the following order:
- 1 stitch (this stitch will be used to create the right side of the neck front)
- Place marker B1
- 1 stitch (this stitch will be used to increase)
- Place marker A1
- Sleeve stitches: _______ + 2 stitches (these 2 stitches will be used to increase) = _______
- Place marker A2
- Back stitches: _______ + 2 stitches (these 2 stitches will be used to increase) = _______
- Place marker A3
- Sleeve stitches: _______ + 2 stitches (these 2 stitches will be used to increase) = _______
- Place marker A4
- 1 stitch (this stitch will be used to increase)
- Place marker B2
- 1 stitch (this stitch will be used to create the left side of the neck front)
Example 1: Using the numbers from equations 2 and 3 in the math we did yesterday my cast on will be as follows; 1, marker B, 1, marker A, 10 (8 sleeve sts + 2), marker A, 33 (31 back sts + 2), marker A, 10 (8 sleeve sts + 2), marker A, 1, marker B, 1
Example 2: Using the numbers from equations 2 and 3 in the math we did yesterday my cast on will be as follows; 1, marker B, 1, marker A, 7 (5 sleeve sts + 2), marker A, 23 (21 back sts + 2), marker A, 7 (5 sleeve sts + 2), marker A, 1, marker B, 1
What It Looks Like
The following diagram illustrates how the neck is cast on and the positioning of the markers:
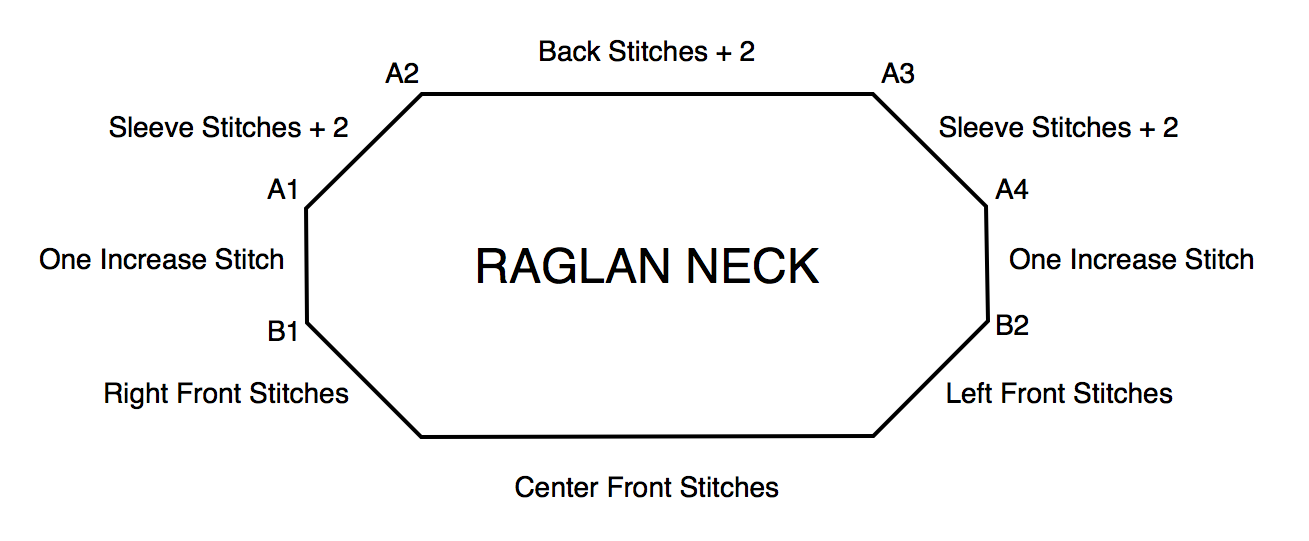
NOTE: You’ll notice that the cast on doesn’t include any right front, left front or center front stitches. Don’t worry. You will be increasing to add those stitches in the coming sections.
Just in case you’re still a little confused on how this is all supposed to work, here is a video that walks you through the process of casting on:
After casting on, purl one row.